Anyway I recently overheard friends talking about Greek yogurt and how they would like to learn to make it but it just seemed really complicated. Several years ago I learn to make Greek yogurt. It was either that or make a serious investment in whichever food company makes Fage because my children were going to break the bank with yogurt consumption. So in an effort to take some of the fear out of this super easy DIY I am putting fingers to type writer once again so that everyone can see just how easy this is.
There are only two "special tools" needed to make Greek yogurt...and only one if you don't plan to make it "Greek".
 Tools and ingredients needed are:
Tools and ingredients needed are:
Large microwave safe bowl (or stock pot if you choose to prepare this on the stove top top)
2 quarts (or more!) milk
Cooking thermometer (Special tool #1)
1 spoonful of high-quality plain yogurt (I use Fage if I haven't made it in a while and am completely out of my homemade stuff, otherwise just use a spoonful from your last batch.)
Optional tools are:

Large stainless steel bowl filled with ice
Gallon sized fabric paint strainer (Special tool#2...buy these at Lowes and reuse them. I've had mine for years!)
Pitcher the paint strainer can fit over
Unless I am planning to make a very large batch (1 gallon or more of milk) of yogurt I use the microwave. It's easy enough to do while I'm getting the kids out the door for school in the morning and I don't run as big a risk as forgetting it and scorching the milk.
So let's get started…
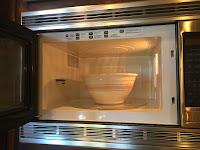 Pour your milk into your microwave safe bowl and heat your milk to between 175° - 180°. In my microwave it takes about 18 minutes. I normally stop and check it at about 12 and then continue to heat in three minute increments until it reaches the desired temperature. The heating process does something to the proteins that allow them to all line up in nice neat little ways so that your yogurt will actually set once you have added your cultures. It is really important you get your milk hot enough but don't boil it.
Pour your milk into your microwave safe bowl and heat your milk to between 175° - 180°. In my microwave it takes about 18 minutes. I normally stop and check it at about 12 and then continue to heat in three minute increments until it reaches the desired temperature. The heating process does something to the proteins that allow them to all line up in nice neat little ways so that your yogurt will actually set once you have added your cultures. It is really important you get your milk hot enough but don't boil it.
Once it is hot enough the hard part is over! If you are like me and tend to forget things I would recommend using our optional tools at this point. Otherwise you can just let the milk cool on it's own down to 115°. I normally forget it while it's cooling and then have to go back and reheat it because it gets too cold before I remember it.

My fast prep method requires me to put the cooking bowl in the bowl of ice to drop the temperature quickly. If I pour the milk out of the bowl into a smaller stainless steel bowl and put that in the ice it cools down really fast…Usually less than two minutes! If you are using this method make sure you keep your thermometer handy. You do not want your milk to drop under 110°. Once your temp is at 115° pour it back into your cooking bowl and stir in your plain yogurt.

If I am using my fast prep method before I drop the temperature on the milk I preheat my oven (otherwise, I do it when I remember I have forgotten about it!) Just turn the oven on and once you see the temperature starting to climb above 100° turn it off but turn the oven light on. The light will help maintain the temperature in the oven for 12 or more hours at a temperature warm enoughto allow the cultures to multiply.
Once you have added the yogurt to your milk cover it with either a lid or kitchen towel and put it in the oven. (Keep the light on!) Now go about your day and forget about it.

I know in our instant gratification society this can prove to be very difficult the first time or even the first few times you make it but trust me, leave it alone! Every time you open the oven your temperature will drop and you want your yogurt to stay nice and toasty warm. Also, once it is in the oven...do not stir it. The more the yogurt is disturbed once the cultures are in it the less likely it will set properly.
If you do this in the morning while you are getting your kiddos ready for school it should be ready to eat by the time they get home in the afternoon assuming it's been at least 6 to 8 hours. Lots of times I make this right before I go to bed at night and it is ready when we wake in the morning.

If you like warm yogurt now is the time to enjoy it! Once it comes out of the oven and you can see it has set up you can just grab a spoon and stir the whey back into it and enjoy your delicious snack.
 If you are like me and prefer Greek yogurt to the more runny version you will have a few more hours to wait. At this point you want to use your paint strainer and a tall pitcher.
  Carefully spoon your yogurt into the paint strainer and allow the whey to drain off of it. Be careful to not just dump the yogurt into the paint strainer as the weight of the milk solids will push too much through the strainer and you'll lose a lot of yogurt. I usually use a large serving spoon to transfer the yogurt to the strainer and pitcher at this point. Once it is in the strainer I put it in the fridge for a few hours. I pour the whey off of it a couple of times during this period. The mass of the yogurt will decrease to about half its original size depending on how long you strain it and how firm you want it.
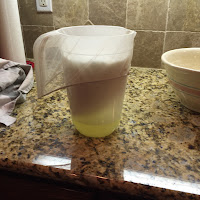 There have been a couple of times I have strained it much firmer than intended and it has come out of the fridge with a consistency more like cream cheese then Greek yogurt. Fortunately there is an easy fix for this!
 Turn the yogurt out of the paint strainer into a mixing bowl and whisk in some milk until it is the consistency that you would like. I usually just use the whisk attachment on my hand blender as it is the fastest way to achieve a smooth texture. Once you are happy with the texture move your yogurt to an airtight container and store in the fridge for up to a week. Or better yet, drizzle a touch of honey on it add nuts, fruits or whatever your favorites things are to add to yogurt and enjoy tasting your "hard work" pay off!
No comments:
Post a Comment